How to Polish Stabwood Mods & Protect Them
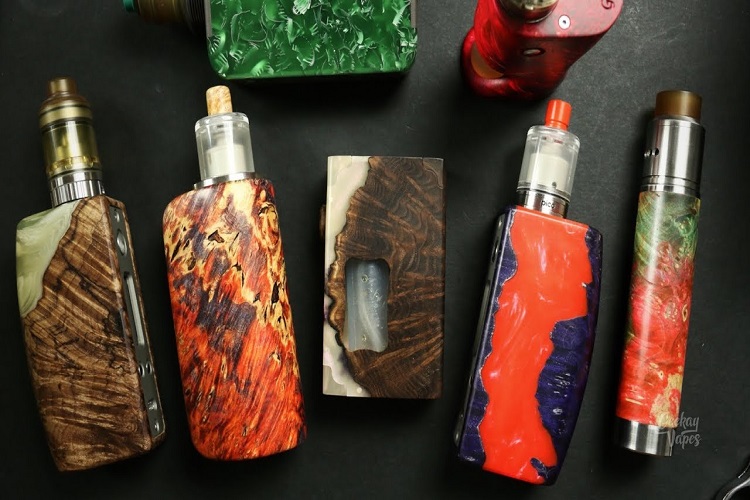
So I now own a handful of really awesome stabwood mods. I love almost every one of them, and since the experience with my first stab wood mod, I have learned how to choose stabwood mods wisely.
So as my collection grew, I started to research how to take care of them and make them look good. A stabwood mod requires very little maintenance, doesn’t get scratched easily and is a piece of art.
However, you can make it look really good and protect the finish of your mod against dust and the weather if you know how. Some people like to clear coat their stab wood mod to protect the finish. Personally I do not like that, as I feel it makes the mod look like it is covered by a stabwood-design sticker and doesn’t allow you to feel the texture of the wood.
So, one of the few articles I found about polishing and was this one published by VapeSnob, an excellent source of information for high-end mods. I tried doing it as they instructed and got good results. However, my stabwood mods didn’t quite shine like I wanted them to.
Then, a stumbled upon a Facebook post showing a shiny, polished stabwood mod. In that post, Stefan Motzer helped me understand the process.
It seems the missing ingredient was MicroMesh, a brand of super-fine polishing sandpaper. It is the only thing that I know has a 12,000 grit sandpaper.
So I combined the two sources of information, and found the solution to getting gorgeous stabwood mods.
Here’s what you need, links are to Amazon where you can purchase them:
- White mineral oil (by Howards for example) meant for cutting boards
- A clean microfiber cloth for the whole process
- Masking tape to cover the areas you don;t need to work on
- MicroMesh pads or strips from 1,500 to 12,000 grit for polishing your mod
- Renaissance wax for protecting your mod and sealing your finish
- Some patience and of course, a stabwood mod
Table of Contents
Step 1: Clean and Apply Mineral Oil
Mask the areas of your mod you do not want to work on, like buttons, screens etc. Remove any detachable parts like battery covers, and put them aside. Then, using a microfiber cloth spread some white mineral oil generously all over your mod.
Take care not to let oil into the masked areas, as it does sometimes get through the tape. You will immediately see richer colors from your stabwood mod. Dark colors get darker, and some previously hidden tones are now visible.
However, it will not look as wet as this when you’re done. Just give it 15 – 20 minutes, and wipe off the access with a dry part of the microfiber cloth.
Step 2: Dry Polishing with MicroMesh
Next start polishing your mod with MicroMesh. As Stefan said, start with the 3,200 grit and work your way up to 12,000. In the video, the mod I used was pretty new and therefore I could start with something a little bit higher.
If your od has scratches, start with 1,500 grit for the effected areas. Once you reach the higher grits, you will start to see more details in the wood than you’ve ever seen before. And yes, it will start to shine by the time you reach the 12,000 grit as you can see in the video.
Do not wet the MicroMesh, it only makes the process more difficult. If you do not have MicroMesh you can try doing it with the highest grit regular sandpaper you can find, although I was only able to find a 3,000 grit before I got MicroMesh and the results were not as good.
Step 3: Seal & Protect with Renaissance Wax
Once you’ve used MicroMesh, apply Renaissance Wax and begin buffing your mod. Renaissance was can be substituted by beeswax, although some people say it leaves small traces of yellow / orange tone behind which can change the color of your mod after a while.
So I highly recommend getting Renaissance Wax from Amazon. It’s not that expensive and you can use it to seal and protect just about everything else. I’ve even used it on my Delrin mods and squonk setups to prevent liquid damage.
The end result, as you can see in the video, is fantastic!
All the burls of the wood are more visible. The colors pop and shine, and you mods will look completely different.
You do not need to do this very often. If you do not have MicroMesh or if your mod has already been polished by the modder, you can work with just the Renaissance Wax.
Once criticism of this method is that the shine doesn’t last very long. I am sure there are other ways, but this is the one I know.
I do not like clear coats on my stabwood mods because I want to feel the texture of my mods. However, obviously it makes like easier for you, so it’s really up to you to decide when getting your own stabwood mod. Some modders give you the choice, others do not.
I hope this article and video was helpful!

