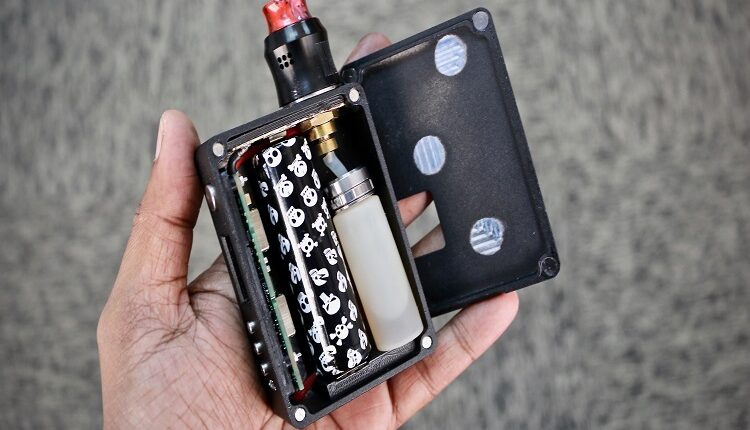
DNA75C / 20700 Analog Box Mods (ABM) Kit – DIY Squonk Mod Part 7
I never expected to get this far in the series, let alone build a regulated mod by myself. And yet, here we are! I am going to build the DNA75C 20700 squonk mod by Analogboxmods.
If you have not looked at the other mods I built getting to this point, do take a look at them:
- DIY Squonk Mod Part 1 – The Research Process
- DIY Squonk Mod Part 2 – ModMaker Parts & Tools
- DIY Squonk Mod Part 3 – Building the ModMaker 18650 Mod
- DIY Squonk Mod Part 4 – The Toaster Design 20700 Mod
- DIY Squonk Mod Part 5 – The ModMaker Parallel 18650 Squonker
- DIY Squonk Mod Part 6 – FAILED Sledz 18650 Squonker
Besides the failed Sledz mod, I enjoyed building all those mechanical squonkers. I’m ready to move to the “big league” of regulated squonk mods.
Even before I started this, I knew that the most difficult part for me would be soldering. So I watched a ton of Youtube videos, picked up a new soldering iron and even wasted a few soldering tips by oxidizing them pretty fast.
Watch this: Soldering basics
Still, I kept on trying until I felt I was ready to do the real thing.
The step-by-step video tutorial by ABM helped a lot on filling the gaps. The video is very informational and I recommend you watch it after you watch mine. I do not show you the soldering parts because the ABM video already does an excellent job at it.
Table of Contents
How much does it cost?
The ABM DNA75C squonk mod kit starts at CAD $105. However, that price is for the DNA75 option with unfinished aluminum enclosure. To build a DNA75C with the ModMaker 510 and powder-coated aluminum enclosure you see in my video, it would cost about CAD $127.
At that price you get the complete kit that contains:
- The milled aluminum enclosure, door and magnets
- The DNA75C board from Evolve
- The ModMaker 510 complete with soldering tabs
- A brass / copper contact plate for grounding
- A 3D-printed holder for the DNA75C and mounting screws
- Two keystone contacts and 3D-printed battery / bottle sled
- The required 16g and 18g / 24g tinned copper wires for DNA75C
- A PET or silicone squonk bottle
I loved the fact that I would get everything I needed to start building right away. This is a huge time-saver for me. It saved a lot of money too, since I could pay only once for shipping instead of buying bits and pieces from multiple websites.
I also recommend getting additional keystone contacts when you buy the kit. Your first attempt at soldering the wire to the keystone contacts may be a complete disaster. It will be more motivating to scrap the failure and start on a fresh new set.
As expected, the biggest challenge was soldering. If you’re new to soldering, please do not try doing the mod. Instead, try soldering other random stuff.
- For example, cut a bit of the provided wire, strip away the silicone, and try putting some solder on the exposed copper. If you cannot do this yet, you’re not ready to assemble the mod.
- You can also try soldering one end of the wire to the other end or to a scrap piece of brass / copper. This is harder than you think.
- I found it easier to tin both connections first, then solder them together with some flux.
Here’s the list of other tools you might need, that will make the whole thing a lot easier to do:
- ModMaker 510 tightening tool for ensuring a perfectly tight fit on the 510
- Epoxy Resin glue for gluing the magnets and board holder
- “Helping Hands” for holding the board and wires when soldering
- Rosin Flux for soldering
- Mini clamps for holding small parts
Also, it’s a good idea to plug-in your DNA75C via USB to your computer right away and make sure everything is working. In my case, the screen was defective and ABM sent me a replacement immediately.
When I finished this mod, it was like a huge veil has been lifted from my eyes. I can see clearly now, the rain has stopped. I can see all the obstacles in my path to making my own mod in the future.
I have now actually build a regulated mod!
Sure, I didn’t mill the body or design the 510, but I did put everything together. I feel like I appreciate the work of modders so much more, and understand what goes into building all those mods I reviewed in the past.
The next project is to build the Floris DNA60 squonk mod. In terms of difficulty, that project is a few steps above the ABM mod. But without this DIY project, I would not have the confidence to move forward.
So thank you ABM!
The mod I build will be put up for auction at the cost price, and the money I get back will really help me a lot in future DIY projects. So do take a look at it and put in your bid.

